- Forum
- Our Servers
-
Leaderboards
-
DarkRP
- DarkRP Gangs
- DarkRP Money Printed
- DarkRP Suit RIPs
- DarkRP Mayor Survival
- DarkRP Nuclear Launches
- DarkRP Bank Vault Raids
- DarkRP Bartender Tips
- DarkRP Air Drops
- DarkRP Casino Vault Raids
- DarkRP Drug Runs
- DarkRP Arena Events
- Police Armory Raids
- Bartender Customers Served
- Police RIPs
- DarkRP GENCoin Sold
- Surf Records
- BHOP Records
- Trouble in Terrorist Town
- Deathrun
- Prop Hunt
-
DarkRP
- Community
- Help
- Store
|
Login to ZARP
|
TOPIC: [SSRP] Information Thread
[SSRP] Information Thread 9 years 8 months ago #404276

Helper NPC, Mayors Security, and Title NPC
Warning: Spoiler! [ Click to expand ][ Click to hide ] These 3 NPCs are located behind the help desk in the spawn building. 
Paycheck Lady
Warning: Spoiler! [ Click to expand ][ Click to hide ] This NPC is located in the corner of the spawn building, not to hard to find. 
Health and Armour NPC's
Warning: Spoiler! [ Click to expand ][ Click to hide ] These guys are located in the Grace General Hospital to the left of Alice 

Banker NPC
Warning: Spoiler! [ Click to expand ][ Click to hide ] He's located inside the Bank of America 
Police Chief and Bail NPC's
Warning: Spoiler! [ Click to expand ][ Click to hide ] They're located in the P.D. (Police Department) 

Drug Dealer
Warning: Spoiler! [ Click to expand ][ Click to hide ] This one took a while to find, he's hiding in between two condos to the left of Taco bell 
Car Dealer and Pimp My Ride
Warning: Spoiler! [ Click to expand ][ Click to hide ] These guys are located at the car Dealership parking lot behind spawn 


Car Scrapper
Warning: Spoiler! [ Click to expand ][ Click to hide ] He's beside the parking garage in the main spawn district 
Miner
Warning: Spoiler! [ Click to expand ][ Click to hide ] He's located on the road out of the city 
Post made by Morgan |
|
|
Edited 9 years 4 months ago by Luan.
The topic has been locked.
|


[SSRP] Information Thread 9 years 8 months ago #404277
|
Hello, this is an introduction for new players to the DarkRP-tools of ZARP, these tools are mainly used for building and removing props + buildings.
Warning: Spoiler! [ Click to expand ][ Click to hide ] 
There are tools you cant use as a user, here is a list of them (the tools you can't use are marked in red): Warning: Spoiler! [ Click to expand ][ Click to hide ] 
Precision Warning: Spoiler! [ Click to expand ][ Click to hide ] 
~1. Apply Applies the settings you have set and moves a prop in the direction you are looking at, you can move the prop from 0 to 100 units (unit is a size unit) , depends on how much units you have set it. -left click to apply setting -right click to push the prop/”reload” to pull the prop ~2. Rotate This setting will rotate a prop arround their own axe and freeze it after. -Left click to start rotating the prop -Move your mouse to rotate the prop ~3. Move This setting will move one prop to another direction. -Left click to start moving the prop (the prop will be ghosted on your crosshair) -Left click again to move the prop to the postion you are looking at ~4. Weld This setting is a mix of "Move" + "Rotate" + "Weld". -Left click to ghost the prop on your crosshair -Left click on another prop to move + weld them together -After you have done that you get a chance to rotate the prop -Left click to confirm and end the welding ~5. Axis This setting will weld 2 props together and this 2 props can rotate arround their own axis. -Left click on a prop -Left click on anther prop -Confirm with another left click ~6. Ballsocket This setting does the same as the "Axis" setting with one little different feature: The prop wont rotate arround their own axis, it wil rotate arround the second prop. -Left click on a prop -Left click on another prop -Left click to confirm it Weld With that tool you can weld props together, that means when 2 props are welded together its one prop. -Left click on a prop -Left click on another prop Warning: Spoiler! [ Click to expand ][ Click to hide ] 
Advanced Duplicator 2 The Andvacned Duplicator duplicates one or more props and they can be pasted anywhere you want. There is only one issue: a bunch of props wont be ghosted when you have got the tool in your hand, one of them is the "Storefront_Template001a_Bars". With that tool you can dupe your building (more props) and save it too. I made a video for this: Button This tool simulates a key of your keyboard/mouse. That basicly means when you press "e" on the button ingame it will press the key that had been set by the owner of the button. Example: player "x" placed a button that simulates the key "T", the key "T" opens a fading door. Player "y" pressed the button and the fading door got opened. -Left click to place a button Warning: Spoiler! [ Click to expand ][ Click to hide ] 
Enable Collison This tool enables and disabled the collision of a prop. That means when the collision is diabled props/you/bodys can just go through the prop. -Enable collison with a left click -Disable collision with a right click Warning: Spoiler! [ Click to expand ][ Click to hide ] 
Fading door This tool creates a fading door on any prop. The fading door let the prop disappear when you press the key you've set, its like a door. -Left click to createa fading door on a prop Warning: Spoiler! [ Click to expand ][ Click to hide ] 
Keypad The keypad is like a button only with a code, when you want to open for example the fading door, you have to enter the code first. -Left click to place a keypad Warning: Spoiler! [ Click to expand ][ Click to hide ] 
Light Spawns a light bulb that makes light in a setted radius. -Left click to spawn a light Warning: Spoiler! [ Click to expand ][ Click to hide ] 
No Collide This tool makes 2 props no collied to eachother, that means 2 props can go through eachother but nothing else can go through. -Left click on the first prop -Left click on the second prop Warning: Spoiler! [ Click to expand ][ Click to hide ] 
Remover Removes eneties/constraints you are looking at -Left click to remove the enetie you are looking at -Right click to remove the enetie + everything that is connected to the entetie -”reload” to remove constraints Warning: Spoiler! [ Click to expand ][ Click to hide ] 
Stacker The stacker tool stacks a prop you are looking at. That basicly means when you stack a prop, the same prop will be appear at the position you have set it. -Left click to stack the prop you are looking at Warning: Spoiler! [ Click to expand ][ Click to hide ] 
Camera The camera tool creates a camera, you can watch trough the camera to see what is happening at the position you have placed it. -Left click to spawn a normal camera -Right click to spawn a camera that always looks at you Warning: Spoiler! [ Click to expand ][ Click to hide ] 
Color That tool can change the color and transparency of a prop. -Choose a color/transparency -Left click to apply the color and transparency on a prop -Right click to set the color and transparency to the deafault Warning: Spoiler! [ Click to expand ][ Click to hide ] 
Material With that tool you can change the material of a prop. -Choose a material -Left click to apply the material on a prop -Right click to set the material of a prop to the deafault material Warning: Spoiler! [ Click to expand ][ Click to hide ] 
Textscreen This tool creates a textscreen, the textscreen can be moved arround and is always frozen after you are stop grabbing it. This tool is also used to indicate people that you are building. -Left click to set a textscreen -Right click to update a already placed textscreen Warning: Spoiler! [ Click to expand ][ Click to hide ] 
Hopefully this Introduction helped you. -WaLK3r
Post made by WalK3r |
|
|
The topic has been locked.
|
[SSRP] Information Thread 9 years 8 months ago #404278

Hello there, in this informative guide you will find tips and infographics on how to become a successful and good member of the ZARP administrative team. Appropriate Behavior of a Staff Member: Warning: Spoiler! [ Click to expand ][ Click to hide ] As a staff member you are expected to conduct yourself as a mature and responsible member of the community, users will look up to you and act like you, this means that if they see you break a rule there is a fairly good chance they will as well. Below you will find a basic infographic on how to conduct yourself. 
Handling F1's as a staff member: Warning: Spoiler! [ Click to expand ][ Click to hide ] Another responsibility as a staff member is for you to handle F1's. During F1's you should be professional but also understanding. You should try and see the situation from the users perspective. Before ending the situation make sure all users understand what has happened and why if any punishment is being given. 
The Users Point of View (POV) Warning: Spoiler! [ Click to expand ][ Click to hide ] Some people may see the situation in another way compared to another person. It is important you take the users POV into account when coming to a conclusion. 
Some good tips as a member of the ZARP staff team: Warning: Spoiler! [ Click to expand ][ Click to hide ]
Things to ask for during sits: Warning: Spoiler! [ Click to expand ][ Click to hide ] Upon starting a sit their are some things you should ask for, you should first ask the user the full story of what happened before teleporting a user, you should then check anything they have said is true, if they say they were arrested by someone check the logs and see if the logs agree. You should also ask if the user has any proof however even if they don't a user may admit to it or they may not understand the rule broken so it is still very much worth talking to them. Meetings: Warning: Spoiler! [ Click to expand ][ Click to hide ] The meeting for the DarkRP game mode is hosted every Saturday at 7PM GMT, while they are optional to attend you should try your best to attend them. Something to remember is the fact that you may not apply for admin until you attend your first meeting. Conflicts with other staff members: Warning: Spoiler! [ Click to expand ][ Click to hide ] If you ever get into a conflict with another staff member the first thing to remember is to keep it private, handle it in a mature manor. Keep it out of OOC and admin chat. In the event of them saying anything disrespectful immediately take proof of this and report it to a member of the leadteam, however they will often require the full conversation so if you provoked it don't expect as much as a serve punishment to come their way. You should always attempt to avoid conflicts with other staff members. Going inactive? Warning: Spoiler! [ Click to expand ][ Click to hide ] First of all you should attempt to contact a member of the lead team, if none are available make a thread on the forums. If you do not notify the lead team you may be demoted. Special Thanks To: Warning: Spoiler! [ Click to expand ][ Click to hide ] I would like to thank the following people in no particular order:
I hope you all have a very good day!
Post made by Wheatley |
|
|
The topic has been locked.
|
[SSRP] Information Thread 9 years 8 months ago #404279
|
Hi there!
So, some of you may not know who i am, my name is Gems and i have been a staff member on zarp for about 9 months at this point, so i would say that i have a decent amount of experience. Im making this "guide" because i have seen alot of staff members out there, simply showing up to an F1, asking for evidence and if there is none they will simply move on. If you think this is all you can do, then you are wrong! So today i will try to teach you some of the tricks i use, to get a player to admit to whatever he may have done. I do realise that this guide may sort of work as a double-edged sword, since a player looking to break the rules could use this knowledge to their advantage, but then again, most of the people who are active on the forums cares about the server and wouldnt break any rules. Lets get started! Step 1: Approaching the request It is extremely important that you give a good first impression to the player once you show up for his request, make sure he isnt busy by teleporting to him first, or using spectate if you have reached admin. Sending him a message asking if he has a moment and waiting for him to reply is always a good idea, it means alot to the player, since that way he wont be confused and unaware about whats going on. Step 2: Hearing him out At first, if the person is frustrated it is important that you calm him down, tell him you will sort things out, try to make him laugh if possible, dont get mad at him for being mad, it will only make things worse and even if you dont agree with his point of view, tell him that you understand why hes frustrated, it will make him trust you. Next up it is extremely important that you have him explain what happended in details, you need to understand what happended and if you dont get it the first time make sure you ask again, it is so important that you understand what went on. alot of F1s will actually be solved at this point, since you will realise that the situation he is describing does not actually contain a rulebreak, in that case simply explain to him why and how it isnt againts the rules. Step 3: Approaching the rulebreaker. player y = victim, player x = potential rulebreaker Now comes the hard part, by overlooking player y's explanation, and reading the logs you will 99 percent of the time be able to create a raw picture of what happened, example: player y explains how player x broke nlr, to raid his base at the warehouse district on server 1. You check the logs and find player x dying to player y 5 times, before finally killing him, all within 3 minutes. Now taking the amount of time it would take player x to run back to the warehouse district, which is rather far from spawn we could assume that player y is telling the truth and at the least 90 percent of the times we would be correct. Another example: Player y accuses player x of rdming him, you check the logs and see that player x has killed player y once, however you have rarely or never seen player y on the server, he is playing as a black market dealer and he overall seems inexperienced. In this scenario we cant assume anything, i would give player y about a 40% chance of being right. Now keep in mind that a high percentage is far from enough, you need to be 100 percent sure. But it will help us on how to approach the rulebreaker. Once you as a staff member have created your picture of the situation it is time to bring the rulebreaker in, you approach just like you would approach the victim, shown above. It is just as important that you get his whole story aswell, it may be completely diffrent from the first one, but mostly it will be around the same, with a few tweaks, make sure you ask in alot and that you take notes of how easily and quickly he is responding, if he is lying he will have trouble making up the story, and he might slip, but if hes telling the truth he wont have any troubles answering any of your questions. Make sure you never reveal what is in your logs to the players, since that is an easy way to catch them lying. At this point the majority of the rulebreaks will be solved, but if you are still not sure, you can use some of these methods: Method 1: Point things out It is highly likely that you have noticed some things or flaws that seemed suspicious during the above points, reveal them all to him in a very dominant manner, make it sound like you really are on to him, if the victim has broken the rule he will often become scared enough to just admit to what hes done at this point, thinking hes really made you mad. Method 2: Baiting / Threatening This one is simple, just remind him of the punishments that are for said rulebreak, tell him that rdming someone is bad, but lying about it could get him worse, alot of rulebreakers will crack using this, thinking the risk isnt worth the reward. Method 3: Lying (Careful!) Now ofcourse being honest is extremely important as a staff member, but there are certain situations where a white lie can be useful. For this method you simply tell the victim to let you do the talking before you teleport the rulebreaker, you can then later confront the rulebreaker saying that you have evidence of the rulebreak, even though you dont! Next off the rulebreaker will do one of two things; Admit to everything, or start screaming abuse! Because of this you wanna be quite sure about your case before using this method. You can push it as far as you want, but make sure that an innocent user knows that you where lying by the end of the F1. Using the information above i am able to handle at the least 95% Of all F1s without evidence. Assuming the accused is not afk. Make sure you always seem neutral and respectful as a startout, but faking temper can without a doubt be helpful, aswell as being friendly and understanding. Just make sure you always use common sense and that you back out if you start feeling like the accused really is innocent. It is highly likely that i have left something out, or made a bunch of typos, feel free to correct me on those and if you have any questions please let me know! If any staff members have tricks that weren't shown here, then write them in below! If you have any criticism or if you would just like to tell me that im an idiot then go ahead, but make sure you bring arguments. Thanks for reading my short guide! Post made by Gems |
|
|
The topic has been locked.
|
[SSRP] Information Thread 9 years 8 months ago #404280
|
General Guide on Reporting Staff/Players & Evidence
Hello. I've decided to create this guide to aid players and staff members alike on gathering evidence for abuse reports on either players or staff members, how to report them and some general tips. This is moreso intended towards new members of the community, or the ones which are having trouble with reporting players & making abuse reports, but I hope it can help anyone interested.
This guide will cover up the following aspects:
Without any further ado, let's begin!
Part 1: Submitting abuse reports
We all have issues from time with time with certain people breaking the rules or staff members acting the way they shouldn't. The Report Abuse section found here was created just for that. To report a certain staff member, you will need to follow the demote request template or if you'd wish to report a certain user, you will need to follow the ban request template. Within a short amount of time your request will be answered by the staff capable to handle it. Keep in mind, you can also report a player, less formally, within the game using the F1 function. Make sure to describe your problem and wait patiently for a staff member. Making a post in the right section Warning: Spoiler! [ Click to expand ][ Click to hide ] 
Make sure to fill in the template and choose a proper title!
Part 2: What is and what is not valid evidence
Evidence of SteamID Of course, we as staff members wouldn't punish a person without any evidence of that person's SteamID, so that we would know that the right person gets punished. Besides the SteamID which you will need to provide within the request, you will also need to provide evidence of the accused player's ID. The best way to do this is take a recording of said rulebreak, and then record the player's identity within the TAB menu, but anything else such as a correctly done screenshot will also do the trick! Example of correct evidence (from Stooki's report) Warning: Spoiler! [ Click to expand ][ Click to hide ] 
Evidence of accused rulebreak Fair enough, you want to get someone punished, but once again, for the right person to be punished, solid evidence must be provided. I personally recommend video recordings, but for certain rulebreaks, screenshots also do the trick. Screenshots can be valid in certain cases such as:
Screenshots can not be valid evidence (exceptions apply) in cases such as:
Part 3: Ways of gathering evidence
After all, it all comes down to evidence. I can assure you that, if enough proof is provided, the guilty party should recieve a proper punishment within a short amount of time. These are the most common ways in which you can gather evidence:
Taking screenshots Whilst in-game, you can press the F5 or F12 button (most common ones) to take a screenshot of your current game. This could provide you with quick and easy evidence in certain cases. Uploading a screenshot after it has been taken Open up the steam overlay (shift+tab) and go to the screenshots tab. From there you press view screenshots, and upload the image you wish. After the upload is done, press "view online" and a webpage should pop up. Give the link to a staff member as evidence. Warning: Spoiler! [ Click to expand ][ Click to hide ] 
Recording your gameplay. This is the option of gathering evidence I'd suggest you use. Sure, it isn't as easy as taking a screenshot, but it will get the job done really good. There are numerous software you can use, which will be provided at the end of this guide, but my personal pick for this is OBS because it is a lightweight program, free and relativley easy to use. Setting up OBS: Warning: Spoiler! [ Click to expand ][ Click to hide ] After the program has been installed, the main menu of it should look somewhat like this 
First off, before getting started, you must provide a scene and a source. Follow my cursor within the next pictures, and do what I do and you should be alright. 
Now, we'll need to do something a bit different, to get it to record Gmod.I personally use this method as it is easier than having the program recording the game, and it doesn't use much memory, and makes it easier for low-end computers to tab out of Gmod faster. Basically, you'll need to add the following parameters: -windowed ; -noborder to your Gmod launch options. To do so, follow the image below. 
Keep in mind that your resolution will need to be native (the current resolution of your monitor) for the game to be full screen. Now, to make sure your file is saved, you will need to set the mode as "File output only" from the Broadcast Settings. Also I preffer saving the video as an MP4. 
You can assign your hotkeys within the Hotkeys tab from the settings. This part of the guide should give you an insight on using OBS as a recorder for your game. If you prefer other software, here are also some some good software you could use to get the job done, but you'll have to find out how to set them up yourself: Fraps Shadowplay (GeForce GPU's) LoiLo Raptr (AMD counterpart of Shadowplay)
Part 4: General Tips and Tricks
This part is the last part, marking the ending of this guide. This part will be rather short. I'll be covering a few tips and tricks which might be helpful when reporting a person. Rebinding the F1 Key Warning: Spoiler! [ Click to expand ][ Click to hide ] Some people say that they're having trouble contacting staff in-game because their F1 key doesn't work. This short gif would be more than enough of an explanation showing how to rebind it properly (This also applies for other keys such as rebinding F4 for inventory) 
Make sure to have the proof ready! Not really mandatory, but it's recommended that you have the proof ready when submitting a report or an admin request. This will save us time, and we wouldn't be needed to wait until the video is uploading or processing. Don't be afraid to ask! If you see a member of the community recording his gameplay and you're unsure how he does it, don't be shy, feel free to ask him what software he uses and how to use it! I'm sure that most community members will help you! Describe your problem! Whenever you're reporting someone in-game make sure to type in the problem. A brief phrase such as "I have just been RDMed at spawn" is enough. Don't make F1's saying "Admin to me". This will save us both time and is a way of solving problems properly.
Epilogue
This is the guide in it's somewhat finished state. Don't forget to leave feedback and anything that could help improve it, and link it towards anyone which you'd think could be helped by this guide.Thanks for reading, have fun and play fair! Post made by Nutzu |
|
|
The topic has been locked.
|
[SSRP] Information Thread 9 years 8 months ago #404281
|
Damage Shield
Along with the new update, new gang upgrades came with! One of these, being one of the most attractive upgrades to purchase was the Damage Shield 1, 2, and 3.
I've tested out explosives on props, and have found out how it works. Once your purchase the first level Damage Shield Upgrade, your props will go through a stage of defense. You can tell how much "Health" your prop has by the color of it. Here's how the colors work. It goes Blue,Orange,Red,Black First Stage Warning: Spoiler! [ Click to expand ][ Click to hide ] 
Second Stage Warning: Spoiler! [ Click to expand ][ Click to hide ] 
Third Stage Warning: Spoiler! [ Click to expand ][ Click to hide ] 
Final Stage [DESTROYED] Warning: Spoiler! [ Click to expand ][ Click to hide ] 
The second and third stage of this upgrade only change how long it takes to change colors of the prop, increasing its life span.
Post made by Morgan
If you would like your post added to this Information Thread, contact me on steam by clicking my signature below.
|
|
|
The topic has been locked.
The following user said Thank You: Raeker
|
[SSRP] Information Thread 9 years 8 months ago #404282
|
The truth is I made this a month or two back and I completly forgot to upload it! so here it is, enjoy, you can calculate how much time it will take you to make profit and I've added a sets sections which you can see common sets profit.

Common Sets Information:
Full Set: 1X Nuclear, 2X Gold, 2X Ruby, 2X Silver, 1X Sapphire, 1X Emerald, 1X Amethyst, 1X Topaz.
High Set: 1X Nuclear, 2X Gold, 1x Sapphire. Normal Set: 1X Nuclear, 2X Gold, 2X Ruby, 1X Sapphire. High Set+: 1X Boosted Nuclear, 2X Gold, 1X Sapphire. Normal Set+: 1X Boosted Nuclear, 2X Gold, 2X Ruby, 1X Sapphire. High Set++: 1X Boosted Nuclear, 2X Boosted Gold, 1X Boosted Sapphire. 
Following What has been shown, it seems as the Full Set is the most profitable and most smart one to buy. Considering you plan to stay on the server for more than 4 hours the High Set++ is the best one for you.
Made by Richard |
|
|
The topic has been locked.
|
[SSRP] Information Thread 9 years 8 months ago #404283

Welcome to Richard's SSRP Staff Guide, this guide will contain all the information needed for staff members (Old & New) including separated guides and tricks to keep our server clean of rule-breakers and our community members happy then ever!
A quick statement, I may be the one who posted the guide but it could never have been done without the help of my friends! Special Thanks to all who helped me, your names are stated below.
* The Second Part will be located in the first comment as I have reached the maximum text I can in one topic And last thing, please comment your feedback and if you have something you suggest I improve or fix please state it in the comments. if you are a New Staff Member or a Promoted Staff Member, head over down to your current rank's guide.
If you are searching for a certain section you can use this list to view the order of the topic and find your way through:

New Moderator Guide:
Congratulations, you have been accepted to join the ZARP Semi-Serious Role-Play servers staff team. First off, we'd like to appreciate the fact you have applied to join and help us keep the enjoyment of players in our servers and we hope you will enjoy it yourself as well.
This guide will contain any information needed for you at your current Moderator rank, It is recommended that you read this guide after receiving training in-game for your new rank or even once you have mastered most of the ranks ability's. The Commands which are available for your use are the following: Moderator Commands: Warning: Spoiler! [ Click to expand ][ Click to hide ] {Moderator} Teleport: The command teleports a selected player to where you are pointing with your mouse. Command: /tp [SteamID/Name]{Moderator} Goto: The command teleports you to a selected player. Command: /goto [SteamID/Name]{Moderator} Bring: The command brings a selected player to your location, it is to be used only if a player is dead or is inside a car. Command: /bring [SteamID/Name]{Moderator} Back: The command teleports a selected player back to his last location from which he was teleported from. Command: /back [SteamID/Name]{Moderator} Back Spawn: The command teleports a selected player back to spawn. Command: /backspawn [SteamID/Name]{Moderator} Warn: The command gives a selected player a warning for breaking the rules, once the warnings add up the player will be automatically kicked and than banned. Command: /warn [SteamID/Name] [Reason]{Moderator} Un-Warn: The command removes the most recent active warning from a selected player. Command: /unwarn [SteamID/Name]{Moderator} Freeze: The command freezes a selected players movement for a selected amount of time. Command: /freeze [SteamID/Name] [Time-Seconds]{Moderator} Un-Freeze: The command un-freezes a selected players movement. Command: /unfreeze [SteamID/Name]{Moderator} Slay: The command slays a selected player in a selected way, this command should be used carefully. Command: /slay [SteamID/Name] [Normal/Silent/Rocket/Explosion]{Moderator} Kick: The command kicks a selected player from the server, should only be used with SteamID's. Command: /kick [SteamID]With your new rank comes two new staff menu's which can be accessed by pressing the buttons 'F1' & 'F6', if you already have these buttons binded to other commands restore them to their original command in the Garry'smod Option's Menu. The F1 Menu: Warning: Spoiler! [ Click to expand ][ Click to hide ] The F1 Menu, is where you will find all recent player request and where you would go in order to handle one, it also contains all recent logs & recent warnings given. F1 Requests Menu: 
Recent Active Warnings: 
Recent Logs: 
The F6 Menu: Warning: Spoiler! [ Click to expand ][ Click to hide ] The F6 Menu is a menu which holds all punishments ever given to players throughout the ZARP SSRP Servers. It is mainly used to view recent warnings in meetings or overall, You can either pick a player in-game or scroll down the list to find the 'Search' Button and from there to search using steam ID's. 
Once your done handling an F1 Request don't forget to un-handle it so the player can create a new one. The Following Video will show you how to do just that: How to Handle & Finish Handling: Warning: Spoiler! [ Click to expand ][ Click to hide ] Quick Note, you may have heard/seen that there are staff member areas in the SSRP Server 1 - These can also be accessed by moderators, if you wish to know how, watch the following videos: Staff Area I: Warning: Spoiler! [ Click to expand ][ Click to hide ] Staff Area II: Warning: Spoiler! [ Click to expand ][ Click to hide ]
Last But Not Least:
A quick set of guidelines which you should follow: Behave professionally and don't be lazy, People will be looking up to you. Do not abuse your powers. And Last! If you are in need of help don't be afraid to ask any staff for help! we are a team after all! 
New Administrator Guide:
Congratulations, you have been promoted to Administrator in ZARP Semi-Serious Role-Play servers. First off, we'd like to appreciate the fact you have applied to contribute even more than what you did. We hope that with your new rank you will help keep the servers even better than before.
This guide will contain any information needed for you at your current Administrator rank, It is recommended that you read this guide after receiving training in-game for your new rank or even once you have mastered most of the ranks ability's. The Commands which are available for your use are the following: Moderator Commands: Warning: Spoiler! [ Click to expand ][ Click to hide ] {Moderator} Teleport: The command teleports a selected player to where you are pointing with your mouse. Command: /tp [SteamID/Name]{Moderator} Goto: The command teleports you to a selected player. Command: /goto [SteamID/Name]{Moderator} Bring: The command brings a selected player to your location, it is to be used only if a player is dead or is inside a car. Command: /bring [SteamID/Name]{Moderator} Back: The command teleports a selected player back to his last location from which he was teleported from. Command: /back [SteamID/Name]{Moderator} Back Spawn: The command teleports a selected player back to spawn. Command: /backspawn [SteamID/Name]{Moderator} Warn: The command gives a selected player a warning for breaking the rules, once the warnings add up the player will be automatically kicked and than banned. Command: /warn [SteamID/Name] [Reason]{Moderator} Un-Warn: The command removes the most recent active warning from a selected player. Command: /unwarn [SteamID/Name]{Moderator} Freeze: The command freezes a selected players movement for a selected amount of time. Command: /freeze [SteamID/Name] [Time-Seconds]{Moderator} Un-Freeze: The command un-freezes a selected players movement. Command: /unfreeze [SteamID/Name]{Moderator} Slay: The command slays a selected player in a selected way, this command should be used carefully. Command: /slay [SteamID/Name] [Normal/Silent/Rocket/Explosion]{Moderator} Kick: The command kicks a selected player from the server, should only be used with SteamID's. Command: /kick [SteamID]Administrator Commands: Warning: Spoiler! [ Click to expand ][ Click to hide ] {Administrator} Ban: The command bans a selected player from the server, should only be used with SteamID's. Command: /ban [SteamID] [Time-Minutes] [Reason]{Administrator} Un-Ban: The command un-bans a selected player from the server, should only be used with SteamID's and only if the player appeal was accept or if his ban was false. Command: /unban [SteamID{Administrator} God: The command grants 'God-Mode' to a selected player, the player who the command is set on cannot die unless it is provoked. Command: /god [SteamID/Name]{Administrator} Un-God: The command provokes 'God-Mode' from a selected player. Command: /ungod [SteamID/Name]{Administrator} Cloak: The command makes a selected player cloaked (invisible). Command: /cloak [SteamID/Name]{Administrator} Un-Cloak: The command provokes the cloak command and makes a selected player un-cloaked (visible). Command: /uncloak [SteamID/Name]{Administrator} Set-Health: The command sets a selected player's Health in a selected amount. Command: /sethealth [SteamID/Name] [Health-Amount]{Administrator} Set-Team: The command sets a selected player's Role-Play Class. Command: /setteam [SteamID/Name] [Class-Name]{Administrator} Strip-Weapons: The command strips a selected player from his equipped items. This command should be used carefully. Command: /stripweapons [SteamID/Name]{Administrator} Jail: The command jails a selected player for a selected amount of time in one of three 'cells'. Command: /jail [SteamID/Name] [Small/Normal/Big] [Time-Seconds]{Administrator} Jail: The command un-jails a selected player. Command: /unjail [SteamID/Name]{Administrator} Voice Mute: The command mutes a selected player and provokes his ability to use a microphone for a selected amount of time. Command: /voicemute [SteamID/Name] [Time-Seconds]{Administrator} Un-Voice Mute: The command un-mutes a selected player and returns his ability to use a microphone. Command: /unvoicemute [SteamID/Name]{Administrator} Chat Mute: The command mutes a selected player and provokes his ability to use chat for a selected amount of time. Command: /chatmute [SteamID/Name] [Time-Seconds]{Administrator} Un-Chat Mute: The command unmutes a selected player and returns his ability to use chat. Command: /unchatmute [SteamID/Name]{Administrator} Spectate: The command grants the ability to enter spectator mode or to spectate a selected player. Command: /spectate [SteamID/Name]
Console & Tab Menu Commands: Warning: Spoiler! [ Click to expand ][ Click to hide ] {Administrator} Freeze Props: The command freezes all the props in the map, This command shouldn't be spammed and used only if necessary. Command: zarp_freeze [In Console]{Administrator} Cancel Recent Votes: The command cancels the most recent RP vote that is commenced, should be used only for false demotes. Command: rp_cancelvote [In Console]{Administrator} Un-Own Doors: The command un-owns a door that is in-front of the staff member while he is commencing the command. Command: rp_unown [In Console]{Administrator} Unlock A Door: The command unlocks a door that you are looking at. Command: rp_unlock [In Console]{Administrator} Lock A Door: The command locks a door that you are looking at. Command: rp_lock [In Console]{Administrator} Add A Door Owner: The command adds a selected player to a door's owenrship. Command: rp_addowner [SteamID/Name] [In Console]{Administrator} Remove A Door Owner: The command removes a selected player from a door's owenrship. Command: rp_removeowner [SteamID/Name] [In Console]{Administrator} Print NLR Logs: The command prints all current players who have a New Life Rule Timer and the time they have left till it is over. Command: print_nlr [In Console]{Administrator} Force Arrest: The command arrests a selected player by his RP Name, Not SteamID!. Command: rp_arrest [Name] [In Console]{Administrator} Force Unarrest: The command unarrests a selected player by his RP Name, Not SteamID!. Command: rp_unarrest [Name] [In Console]{Administrator} Ban From Job : The command bans a player from a certain job/class for a selected amount of time. Tab Command Button: 
{Administrator} Un-Ban From Job : The command un-bans a player from a certain job/class, Should be use in case of a false demote. Tab Command Button: 
Your new rank gives you three special abilities which are:
Reciving these three abilities is a great honor and respect from the lead staff team, as they can be highly abused. You should only use them if necessary, While Nocliping, Make sure you are cloaked so you won't disturb players role-play. and picking players up should only be used in need of moving them to a sit or freezing them quickly. If you wish to disable your physgun permissions making you able to point at players without picking them up or touching their props, do as the following video: Warning: Spoiler! [ Click to expand ][ Click to hide ] To see how much money a player has on him for what random reason you have go to his Tab Menu Profile, just as the following video: Warning: Spoiler! [ Click to expand ][ Click to hide ] Last but not least you have now the permission to accept or deny Ban/Unban Requests in the forums (Not Including ones given by you!), To do so, do as following: How To Review a SSRP Ban/Unban Requests:
The Unban Menu can be accessed through your Tab Menu - Server Settings - Unban. in it you can manage all bans in the server, just as the following video shows: Warning: Spoiler! [ Click to expand ][ Click to hide ]
A quick set of guidelines which you should follow:
Do Not Punish other staff even though you have the ability to do so. Do Not use ban as an easy way out of things, try to talk to accused/rule breaking players. Behave professionally and don't be lazy, People will be looking up to you. Do not abuse your powers. And last, If you are need of any help, don't be afraid to ask any staff members, we are a team after all! Now you're ready to be a damn good admin! head over to the servers and show them the ADMIN you are! 
Super-Administrator Guide:
Congratulations, you have been promoted to Super-Administrator in ZARP Semi-Serious Role-Play servers. First off, we'd like to appreciate the fact you are such a dedicated player to our community, it is a pleasure to have you in our staff team. We hope that with your new rank you will help keep the servers even better than before. This guide will contain any information needed for you at your current Super-Administrator rank, It is recommended that you read this guide after receiving training in-game for your new rank or even once you have mastered most of the ranks ability's. The Commands which are available for your use are the following: Moderator Commands: Warning: Spoiler! [ Click to expand ][ Click to hide ] {Moderator} Teleport: The command teleports a selected player to where you are pointing with your mouse. Command: /tp [SteamID/Name]{Moderator} Goto: The command teleports you to a selected player. Command: /goto [SteamID/Name]{Moderator} Bring: The command brings a selected player to your location, it is to be used only if a player is dead or is inside a car. Command: /bring [SteamID/Name]{Moderator} Back: The command teleports a selected player back to his last location from which he was teleported from. Command: /back [SteamID/Name]{Moderator} Back Spawn: The command teleports a selected player back to spawn. Command: /backspawn [SteamID/Name]{Moderator} Warn: The command gives a selected player a warning for breaking the rules, once the warnings add up the player will be automatically kicked and than banned. Command: /warn [SteamID/Name] [Reason]{Moderator} Un-Warn: The command removes the most recent active warning from a selected player. Command: /unwarn [SteamID/Name]{Moderator} Freeze: The command freezes a selected players movement for a selected amount of time. Command: /freeze [SteamID/Name] [Time-Seconds]{Moderator} Un-Freeze: The command un-freezes a selected players movement. Command: /unfreeze [SteamID/Name]{Moderator} Slay: The command slays a selected player in a selected way, this command should be used carefully. Command: /slay [SteamID/Name] [Normal/Silent/Rocket/Explosion]{Moderator} Kick: The command kicks a selected player from the server, should only be used with SteamID's. Command: /kick [SteamID]Administrator Commands: Warning: Spoiler! [ Click to expand ][ Click to hide ] {Administrator} Ban: The command bans a selected player from the server, should only be used with SteamID's. Command: /ban [SteamID] [Time-Minutes] [Reason]{Administrator} Un-Ban: The command un-bans a selected player from the server, should only be used with SteamID's and only if the player appeal was accept or if his ban was false. Command: /unban [SteamID{Administrator} God: The command grants 'God-Mode' to a selected player, the player who the command is set on cannot die unless it is provoked. Command: /god [SteamID/Name]{Administrator} Un-God: The command provokes 'God-Mode' from a selected player. Command: /ungod [SteamID/Name]{Administrator} Cloak: The command makes a selected player cloaked (invisible). Command: /cloak [SteamID/Name]{Administrator} Un-Cloak: The command provokes the cloak command and makes a selected player un-cloaked (visible). Command: /uncloak [SteamID/Name]{Administrator} Set-Health: The command sets a selected player's Health in a selected amount. Command: /sethealth [SteamID/Name] [Health-Amount]{Administrator} Set-Team: The command sets a selected player's Role-Play Class. Command: /setteam [SteamID/Name] [Class-Name]{Administrator} Strip-Weapons: The command strips a selected player from his equipped items. This command should be used carefully. Command: /stripweapons [SteamID/Name]{Administrator} Jail: The command jails a selected player for a selected amount of time in one of three 'cells'. Command: /jail [SteamID/Name] [Small/Normal/Big] [Time-Seconds]{Administrator} Jail: The command un-jails a selected player. Command: /unjail [SteamID/Name]{Administrator} Voice Mute: The command mutes a selected player and provokes his ability to use a microphone for a selected amount of time. Command: /voicemute [SteamID/Name] [Time-Seconds]{Administrator} Un-Voice Mute: The command un-mutes a selected player and returns his ability to use a microphone. Command: /unvoicemute [SteamID/Name]{Administrator} Chat Mute: The command mutes a selected player and provokes his ability to use chat for a selected amount of time. Command: /chatmute [SteamID/Name] [Time-Seconds]{Administrator} Un-Chat Mute: The command unmutes a selected player and returns his ability to use chat. Command: /unchatmute [SteamID/Name]{Administrator} Spectate: The command grants the ability to enter spectator mode or to spectate a selected player. Command: /spectate [SteamID/Name]Super-Administrator Commands: Warning: Spoiler! [ Click to expand ][ Click to hide ] {Super Administrator} Check Sharing: The command checks if a selected player has an alternate account connected in-game. Command: /checksharing[SteamID/Name]{Super Administrator} Anti-Cheat Request: The command checks a selcted player for active cheats. Command: /anticheatrequest [SteamID/Name]{Super Administrator} Ignite: The command sets a selected player on fire for a certain time. Command: /ignite [SteamID/Name] [Time-Seconds]{Super Administrator} Un-Ignite: The command disables the ignite command if used on a selected player. Command: /unignite [SteamID/Name]{Super Administrator} Slap: The command slaps a player with a selected amount of damage and times. Command: /slap [SteamID/Name] [Damage] [Amount Of Slaps]{Super Administrator} Set Noclip: The command Enables/Disables the ability of a player to noclip. Command: /setnoclip [SteamID/Name] [1/0]{Super Administrator} Remove Group: The command removes a player from a rank group. POSSIBLY BROKEN Command: /removegroup [SteamID/Name] [GroupID]{Super Administrator} Set Mod: The command sets the rank of a player to moderator. POSSIBLY BROKEN Command: /setmod[SteamID/Name]
Console & Tab Menu Commands: Warning: Spoiler! [ Click to expand ][ Click to hide ] {Administrator} Freeze Props: The command freezes all the props in the map, This command shouldn't be spammed and used only if necessary. Command: zarp_freeze [In Console]{Administrator} Cancel Recent Votes: The command cancels the most recent RP vote that is commenced, should be used only for false demotes. Command: rp_cancelvote [In Console]{Administrator} Un-Own Doors: The command un-owns a door that is in-front of the staff member while he is commencing the command. Command: rp_unown [In Console]{Administrator} Unlock A Door: The command unlocks a door that you are looking at. Command: rp_unlock [In Console]{Administrator} Lock A Door: The command locks a door that you are looking at. Command: rp_lock [In Console]{Administrator} Add A Door Owner: The command adds a selected player to a door's owenrship. Command: rp_addowner [SteamID/Name] [In Console]{Administrator} Remove A Door Owner: The command removes a selected player from a door's owenrship. Command: rp_removeowner [SteamID/Name] [In Console]{Administrator} Print NLR Logs: The command prints all current players who have a New Life Rule Timer and the time they have left till it is over. Command: print_nlr [In Console]{Administrator} Force Arrest: The command arrests a selected player by his RP Name, Not SteamID!. Command: rp_arrest [Name] [In Console]{Administrator} Force Unarrest: The command unarrests a selected player by his RP Name, Not SteamID!. Command: rp_unarrest [Name] [In Console]{Administrator} Ban From Job : The command bans a player from a certain job/class for a selected amount of time. Tab Command Button:
{Administrator} Un-Ban From Job : The command un-bans a player from a certain job/class, Should be use in case of a false demote. Tab Command Button:
{Super Administrator} Print F1 Request List: The command prints out the F1 Request List showing how many requests have been done by staff members. Command: rp_listf1 [In Console]
Head-Administrator Guide:
Congratulations, you have been promoted to Head-Administrator in ZARP Semi-Serious Role-Play servers. First off, we'd like to appreciate the fact you are such a dedicated player to our community, it is a pleasure to have you in our staff team. We hope that with your new rank you will help keep the servers even better than before. This guide will contain any information needed for you at your current Head-Administrator rank, It is recommended that you read this guide after receiving training in-game for your new rank or even once you have mastered most of the ranks ability's. The Commands which are available for your use are the following: Moderator Commands: Warning: Spoiler! [ Click to expand ][ Click to hide ] {Moderator} Teleport: The command teleports a selected player to where you are pointing with your mouse. Command: /tp [SteamID/Name]{Moderator} Goto: The command teleports you to a selected player. Command: /goto [SteamID/Name]{Moderator} Bring: The command brings a selected player to your location, it is to be used only if a player is dead or is inside a car. Command: /bring [SteamID/Name]{Moderator} Back: The command teleports a selected player back to his last location from which he was teleported from. Command: /back [SteamID/Name]{Moderator} Back Spawn: The command teleports a selected player back to spawn. Command: /backspawn [SteamID/Name]{Moderator} Warn: The command gives a selected player a warning for breaking the rules, once the warnings add up the player will be automatically kicked and than banned. Command: /warn [SteamID/Name] [Reason]{Moderator} Un-Warn: The command removes the most recent active warning from a selected player. Command: /unwarn [SteamID/Name]{Moderator} Freeze: The command freezes a selected players movement for a selected amount of time. Command: /freeze [SteamID/Name] [Time-Seconds]{Moderator} Un-Freeze: The command un-freezes a selected players movement. Command: /unfreeze [SteamID/Name]{Moderator} Slay: The command slays a selected player in a selected way, this command should be used carefully. Command: /slay [SteamID/Name] [Normal/Silent/Rocket/Explosion]{Moderator} Kick: The command kicks a selected player from the server, should only be used with SteamID's. Command: /kick [SteamID]Administrator Commands: Warning: Spoiler! [ Click to expand ][ Click to hide ] {Administrator} Ban: The command bans a selected player from the server, should only be used with SteamID's. Command: /ban [SteamID] [Time-Minutes] [Reason]{Administrator} Un-Ban: The command un-bans a selected player from the server, should only be used with SteamID's and only if the player appeal was accept or if his ban was false. Command: /unban [SteamID{Administrator} God: The command grants 'God-Mode' to a selected player, the player who the command is set on cannot die unless it is provoked. Command: /god [SteamID/Name]{Administrator} Un-God: The command provokes 'God-Mode' from a selected player. Command: /ungod [SteamID/Name]{Administrator} Cloak: The command makes a selected player cloaked (invisible). Command: /cloak [SteamID/Name]{Administrator} Un-Cloak: The command provokes the cloak command and makes a selected player un-cloaked (visible). Command: /uncloak [SteamID/Name]{Administrator} Set-Health: The command sets a selected player's Health in a selected amount. Command: /sethealth [SteamID/Name] [Health-Amount]{Administrator} Set-Team: The command sets a selected player's Role-Play Class. Command: /setteam [SteamID/Name] [Class-Name]{Administrator} Strip-Weapons: The command strips a selected player from his equipped items. This command should be used carefully. Command: /stripweapons [SteamID/Name]{Administrator} Jail: The command jails a selected player for a selected amount of time in one of three 'cells'. Command: /jail [SteamID/Name] [Small/Normal/Big] [Time-Seconds]{Administrator} Jail: The command un-jails a selected player. Command: /unjail [SteamID/Name]{Administrator} Voice Mute: The command mutes a selected player and provokes his ability to use a microphone for a selected amount of time. Command: /voicemute [SteamID/Name] [Time-Seconds]{Administrator} Un-Voice Mute: The command un-mutes a selected player and returns his ability to use a microphone. Command: /unvoicemute [SteamID/Name]{Administrator} Chat Mute: The command mutes a selected player and provokes his ability to use chat for a selected amount of time. Command: /chatmute [SteamID/Name] [Time-Seconds]{Administrator} Un-Chat Mute: The command unmutes a selected player and returns his ability to use chat. Command: /unchatmute [SteamID/Name]{Administrator} Spectate: The command grants the ability to enter spectator mode or to spectate a selected player. Command: /spectate [SteamID/Name]Super-Administrator Commands: Warning: Spoiler! [ Click to expand ][ Click to hide ] {Super Administrator} Check Sharing: The command checks if a selected player has an alternate account connected in-game. Command: /checksharing[SteamID/Name]{Super Administrator} Anti-Cheat Request: The command checks a selcted player for active cheats. Command: /anticheatrequest [SteamID/Name]{Super Administrator} Ignite: The command sets a selected player on fire for a certain time. Command: /ignite [SteamID/Name] [Time-Seconds]{Super Administrator} Un-Ignite: The command disables the ignite command if used on a selected player. Command: /unignite [SteamID/Name]{Super Administrator} Slap: The command slaps a player with a selected amount of damage and times. Command: /slap [SteamID/Name] [Damage] [Amount Of Slaps]{Super Administrator} Set Noclip: The command Enables/Disables the ability of a player to noclip. Command: /setnoclip [SteamID/Name] [1/0]{Super Administrator} Remove Group: The command removes a player from a rank group. POSSIBLY BROKEN Command: /removegroup [SteamID/Name] [GroupID]{Super Administrator} Set Mod: The command sets the rank of a player to moderator. POSSIBLY BROKEN Command: /setmod[SteamID/Name]Head-Administrator Commands: Warning: Spoiler! [ Click to expand ][ Click to hide ] {Head Administrator} Set Access: The command sets a certain players staff commands access, Although using the tab menu is more smart and useful. Command: /setaccess [SteamID/Name] [User/Moderator/Administrator/SuperAdministrator]{Head Administrator} Ragdoll: The command ragdolls a selected player in a one of three types of ragdolling. Command: /ragdoll [SteamID/Name] [Normal/Hang/Kick]{Head Administrator} Clear Decals: The command clears all decals in the server. Command: /cleardecals{Head Administrator} Set Spawn: The command sets a new spawn location to a certain class/job. Command: /setspawn [Class/Team]{Head Administrator} Jail Postion: The command sets a new jail spawn position where you stand. Command: /jailpos{Head Administrator} Clean Up: The command removes all props from the map, Recommended never to use.. Command: /cleanup{Head Administrator} Rcon Commands Menu: The command opens the Rcon Commands Menu. Command: /rcon{Head Administrator} Logging: The Command ************. Command: /logging{Head Administrator} Give Weapons: The command gives a chosen weapon to a selected player. Command: /giveweapon [SteamID/Name] [Weapon_ID]All ZARP SSRP Weapon ID's: Warning: Spoiler! [ Click to expand ][ Click to hide ] Main: gmod_camera - Camera gmod_tool - Tool Gun weapon_physgun - PhysGun weapon_physcannon - GravityGun med_kit - MedKit weapon_fists - Fists Specials: weapon_gammashooter - Gamma Rifle weapon_hand_cannon - Hand Canon ls_sniper - Silent Sniper m9k_matador - Matador Rocket Launcher m9k_m202 - M202 Rocket Launcher m9k_milkormgl - Milkor Grenade Launcher m9k_rpg7 - RPG Rocket Launcher m9k_orbital_strike - Orbital Strike snowball_thrower - Chirstmas Snowball m9k_ares_shrike - Ares Shrike m9k_minigun - M134 Minigun m9k_pkm - PKM m9k_f2000 - F2000 m9k_striker12 - Striker 12 m9k_suicide_bomb - Timed C4 m9k_proxy_mine - Proximity Mine m9k_nitro - Nitro Glycerine m9k_nerve_gas - Nerve Gas m9k_jackhammer - Jack Hammer m9k_thompson - Tommy Gun m9k_machete - Machete m9k_damascus - Damascus Sword m9k_doorcharge - Door Charge weapon_slam - SLAM weapon_bugbait - Bug Bait weapon_stunstick - Stun Stick m9k_knife - Knife Grenades: weapon_real_cs_flash - Flash Grenade weapon_real_cs_grenade - Explosive Grenade weapon_real_cs_smoke - Smoke Grenade m9k_emp_grenade - EMP Grenade Snipers: m9k_aw50 - AI AW50 m9k_svu - Dragunov SVU m9k_psg1 - PSG-1 m9k_m24 - M24 Shotguns: m9k_m3 - Benelli M3 m9k_mossberg590 - Mossberg m9k_spas12 - SPAS 12 Automatic: m9k_auga3 - Steyr AUG A3 m9k_l85 - L85 m9k_vector - Kriss Vector m9k_m249lmg - M249 LMG m9k_uzi - UZI m9k_mp5sd - MP5SD m9k_mp9 - MP9 m9k_ump45 - HK UMP45 m9k_smgp90 - FN P90 m9k_ak47 - AK-47 m9k_fal - FN FAL m9k_m4a1 - M4A1 Iron m9k_famas - Famas Pistols: m9k_m92beretta - M92 Beretta m9k_deagle - Desert Eagle m9k_usp - HK USP m9k_sig_p229r - SIG Sauer P229R m9k_glock - Glock 18 m9k_colt1911 - Colt 1911 m9k_coltpython - Colt Python
Console & Tab Menu Commands: Warning: Spoiler! [ Click to expand ][ Click to hide ] {Administrator} Freeze Props: The command freezes all the props in the map, This command shouldn't be spammed and used only if necessary. Command: zarp_freeze [In Console]{Administrator} Cancel Recent Votes: The command cancels the most recent RP vote that is commenced, should be used only for false demotes. Command: rp_cancelvote [In Console]{Administrator} Un-Own Doors: The command un-owns a door that is in-front of the staff member while he is commencing the command. Command: rp_unown [In Console]{Administrator} Unlock A Door: The command unlocks a door that you are looking at. Command: rp_unlock [In Console]{Administrator} Lock A Door: The command locks a door that you are looking at. Command: rp_lock [In Console]{Administrator} Add A Door Owner: The command adds a selected player to a door's owenrship. Command: rp_addowner [SteamID/Name] [In Console]{Administrator} Remove A Door Owner: The command removes a selected player from a door's owenrship. Command: rp_removeowner [SteamID/Name] [In Console]{Administrator} Print NLR Logs: The command prints all current players who have a New Life Rule Timer and the time they have left till it is over. Command: print_nlr [In Console]{Administrator} Force Arrest: The command arrests a selected player by his RP Name, Not SteamID!. Command: rp_arrest [Name] [In Console]{Administrator} Force Unarrest: The command unarrests a selected player by his RP Name, Not SteamID!. Command: rp_unarrest [Name] [In Console]{Administrator} Ban From Job : The command bans a player from a certain job/class for a selected amount of time. Tab Command Button:
{Administrator} Un-Ban From Job : The command un-bans a player from a certain job/class, Should be use in case of a false demote. Tab Command Button:
{Super Administrator} Print F1 Request List: The command prints out the F1 Request List showing how many requests have been done by staff members. Command: rp_listf1 [In Console]{Head Administrator} Global Message: The command sends a Global Message to all active players. Command: rp_tellall [Message] [In Console]{Head Administrator} Vault Respawn: The command respawns the vault. Command: zarp_respawnvault [In Console]{Head Administrator} Restart Server The command restarts the server based on a given time. Command: h_restart [Seconds] [In Console]{Head Administrator} Cancel Server Restart The command cancels a server restart timer. Command: h_restart_abort [In Console]{Head Administrator} Reload NPCs The command respawns and reloads all NPCs. Command: rp_reloadnpc [In Console]{Head Administrator} NPC Spawn Menu The command opens the NPC's Spawn Menu. Command: ldrp_npcpos [In Console]{Head Administrator} Shop Entity Menu The command open the Shop Entity Menu. Command: ldrp_shopentitymenu [In Console]{Head Administrator} Spawn Rock The command spawns a selected mining rock. Command: ldrp_spawnrock [Ruby/Gold/Stone] [In Console]As a Head Admin you are in charge of managing the staff team. Head Administrators are the second highest in-game rank. Your job is to deal with staff to staff problems mostly. You can issue demotions in case of an emergency and you are given access to all administrative commands, tools and utilities. 
Head Down To The First Comment To See The Second Part Of The Guide!

Common F1-Request Situations:
This section will describe a bit detail about the possible situations that might occur in your future F1 requests, Each situation will have the an UN-DETAILED explanation of what you need to do, It is recommended that you keep this page open while handling F1 Requests, it might help you. RDM Warning: Spoiler! [ Click to expand ][ Click to hide ] The rule that was probably broken is: 2.1 Random Death Match - In order to kill a player, you must have a roleplay-valid reason to do so.RDA Warning: Spoiler! [ Click to expand ][ Click to hide ] The rule that was probably broken is: Job Rules - Police Class - They may only arrest wanted/people who break city law.CDM Warning: Spoiler! [ Click to expand ][ Click to hide ] The rule that was probably broken is: 3.1 a CDM Server 1 - You must actively avoid killing players, this included the road and pavement.(please note this can sometimes be unavoidable due to lag. Please make sure you take this into consideration before punishing players)Remmber That the SSRP Server 2 Rule states differently: 3.1 b CDM Server 2 - You are not allowed to purposely run people over that are on the grass or pavement area.It is rarely seen that people kill others using cars on purpose, so if you believe that it is you can ask for an admin to spectate the driver for a while. Prop-Block Warning: Spoiler! [ Click to expand ][ Click to hide ] The rule that was probably broken is: 2.4 Prop Abuse - The use of a prop to kill, push, or surf entities is not permitted.First off confront the accused person who was prop-blocking and explain to him he must use a fading door with keypads/buttons to allow passage. if he does not know how to make a fading door link him to a Youtube Tutorial or Steam Guide explaining it. you can find one below in the "How To Questions" Section. Prop-Climb Warning: Spoiler! [ Click to expand ][ Click to hide ] The rule that was probably broken is: 2.4 Prop Abuse - The use of a prop to kill, push, or surf entities is not permitted.The accused may have made a sky-base, in that case explain to him he must have supportive props holding it according to the base rules. If the accused was indeed using a prop to reach somewhere he shouldn't you should confront him about it and if he does it again possibly punish him. Prop-Push Warning: Spoiler! [ Click to expand ][ Click to hide ] The rule that was probably broken is: 2.4 Prop Abuse - The use of a prop to kill, push, or surf entities is not permitted.Prop Pushing is usually done by purpose, as any other rule break you need to explain the accused what he did wrong, and in fact give him a warning. Disrespect Warning: Spoiler! [ Click to expand ][ Click to hide ] The rule that was probably broken is: 1.2 Disrespect - Users of the ZARP community server are to conduct themselves respectfully at all times.Or / And: 1.1 Discrimination - Discrimination in any form (sexism, racism, prejudicial remarks) are not permitted on our server./code]
Disrespecting players or staff is a harsh rule break in ZARP and should be treated with the up-most care and alert. If a user possibly adds Discrimination in his disrespect he should be punished heavily. You should explain to players that it is not allowed here on ZARP and tell them to never do it again.
[/spoiler]
[color=#bb4400][size=4][font=Comic Sans MS][b]Mic-Spam[/b][/font][/size][/color]
[spoiler]
[b]The rule that was probably broken is:[/b]
[code]1.6 Mic spam - Spamming the mic is unacceptable in any format, whether it be screaming, singing, repeating yourself or playing music unless another rule states otherwise.There are several ways to deal with mic spam, the most common and effective one is to ask the player to stop and if he continues to mute him. notice that some rules overrule the mic spam rule, for example: A Radio Manager is allowed to sing/play music while driving his car around the map or while performing on a stage. Illegal Base Warning: Spoiler! [ Click to expand ][ Click to hide ] The rule that was probably broken is: one of the 4.0 Base Rules, (4.1 - 4.30)In case of a player breaking one of these rules, you should explain to him how he is breaking it and show him how to fix it, possibly guiding him through the whole process until his base is alright, DO NOT! by any chance delete his base without having a talk to him. If he refuses to accept what you are asking him to do after showing him the rule you may act more harshly. NLR Warning: Spoiler! [ Click to expand ][ Click to hide ] The rule that was probably broken is: 2.2 New Life Rule - Do not return or interact with the area of your death (between two tunnels) that you died until 3 minutes has passed. There is a timer at the top of your screen. If you died in the spawn area, leave it promptly through the nearest tunnel or AFK at spawn, you must also forget everything about your previous life and start a new one, as from it's name "New Life Rule"This rule is very commonly broken in ZARP SSRP, note that it's also hard to follow up if broken, you must have proof that the player died and returned to the same place before a phase of 3 minutes passed as the logs are not enough to prove so. Note that there are rules that override the New Life Rule, and they are: 6.4 Police jobs do not have NLR at the bank vault during a raid. ( ONLY when Raid is active )7.3 Police jobs do not have NLR at the base during a Active Nuke raid.Police Job Rules - Police can break NLR ONLY at the PD.Raid Cooldown Timer Warning: Spoiler! [ Click to expand ][ Click to hide ] The rule that was probably broken is: 5.1 Cooldown - Do not raid the same base twice within 10 minutes.If a guy is reported for breaking the cooldown, check if it's true. If it is, explain to him he can only raid the same base after a 10 minutes cooldown from when he died. Common Questions Warning: Spoiler! [ Click to expand ][ Click to hide ] What are the maximum prop amounts I can spawn? 70 If you are VIP, 50 If you are a Normal User. How can I get money? There are many ways to get money, some of them are: Raiding, Printing, Growing & Manufacturing Drugs, Selling Weapons Etc.. How do I contact a staff member? You can contact a staff member using the F1 Request System - by pressing F1, Adding them on Steam or asking them in-game for help. How can I add items to my inventory? You can add items to your inventory by picking them up or typing /holster while having them on you. How-To Questions Warning: Spoiler! [ Click to expand ][ Click to hide ] If you encounter a player asking for help in using a certain tool or in understanding the gamemode, do not waste your time trying to explain it to them, as it might take a lot of time and present a lot of misunderstood explanations. In-stead of doing that you can link them to an existing YouTube Tutorial or Steam Guide which explains the question quite thoroughly. A Few Videos: How To Create A Fading Door With A Keypad: How To Use The Precision Tool: How To Play DarkRP: 
Recommended Staff Keybindings:
As a staff member it is always good to have your commands bound into your keyboard keys. this section will show you how to bind your commands with a recommended key to use. Note! if you think you will accidentally press these buttons while role-playing do not bind them for your own safety. First off, to bind a chat command to a key you will have to type the following code in Garry'smod Console. (Press '~' in-game to enter console mode). Bind '[Key_Name]' "say [Command]Bind 'B' "say /tp"I personally recommend placing your key bindings on the numpad area, The numpad area is a place which is used only for fading doors in game and has the ability to be locked/inaccessible by pressing 'Num_Lock' button. Numpad Key Names:
Recommended Commands Keybinding: {Moderator] Key binds: Bind 'KP_END' "say /tp" - TeleportBind 'KP_DOWNARROW' "say /back" - Teleport BackBind 'KP_PGDN' "say /backspawn" - Telport Back to Spawn{Administrator] Key binds: Bind 'KP_LEFTARROW' "say /cloak [RP-Name]" - CloakBind 'KP_5' "say /uncloak [RP-Name]" - Un-CloakBind 'KP_RIGHTARROW' "say /god [RP-Name]" - Enable God ModeBind 'KP_HOME' "say /ungod [RP-Name]" - Disable God ModeBind 'KP_UPARROW' "zarp_freeze" - Freeze All PropsBind 'KP_PGUP' "rp_unown" - Unown Door
SSRP Meeting Information:
The ZARP SSRP Server has staff meetings each week at Saturday 19:00 PM - GMT in which:
The loop of reviewing applications in the SSRP meeting is:

Staff Member Areas:
In ZARP we have two SSRP Servers, however, only one of them has Staff Member Areas, these are as stated - only for staff members use, A Player or a Moderator may be given the permission to host an event in one of these areas by an Admin. These areas are accessible for all staff members and can be reached using Noclip or Teleport. Staff Area I: Warning: Spoiler! [ Click to expand ][ Click to hide ] Staff Area II: Warning: Spoiler! [ Click to expand ][ Click to hide ] 
Staff Guidelines & Rules:
The following are the main guideline rules to all staff members, it is recommended you follow them in order to make yourself as useful and helpful to players and to prevent yourself from getting demoted.
General Guidelines
Admins+ Guidelines
Guidelines & Rules written by RedPowder! |
|
|
Edited 9 years 1 month ago by Raifster123. Reason: Fixed/removed things
The topic has been locked.
The following user said Thank You: Raeker
|
[SSRP] Information Thread 9 years 8 months ago #404284

The F1 & The F6 Menus:
As a staff member you have access to two staff menus which are there to help you maintain the server. The F1 Menu: The F1 Menu, is where you will find all recent player request and where you would go in order to handle one, it also contains all recent logs & recent warnings given. Warning: Spoiler! [ Click to expand ][ Click to hide ] When ever there is a new F1 Request you will recive two notifications: A pop-up message on the top-right of your screen saying a player has submitted an F1 Request and the reason for it. 
And a sticky message on the bottom-left of your screen saying there is an F1 which is unhandled. 
If an F1 Request is not answered within 10 Minutes you will receive another pop-up on the top-right of your screen stating so. 
In order to learn how to handle a request I suggest you read the following thread created by Wheatley: Warning: Spoiler! [ Click to expand ][ Click to hide ] As a staff member you are expected to conduct yourself as a mature and responsible member of the community, users will look up to you and act like you, this means that if they see you break a rule there is a fairly good chance they will as well. Below you will find a basic infographic on how to conduct yourself.
Another responsibility as a staff member is for you to handle F1's. During F1's you should be professional but also understanding. You should try and see the situation from the users perspective. Before ending the situation make sure all users understand what has happened and why if any punishment is being given.
Some people may see the situation in another way compared to another person. It is important you take the users POV into account when coming to a conclusion.
All rights for these photos and text go to Wheatley. The F6 Menu: The F6 Menu is a menu which holds all punishments ever given to players throughout the ZARP SSRP Servers. It is mainly used to view recent warnings in meetings or overall, You can either pick a player in-game or scroll down the list to find the 'Search' Button and from there to search using SteamID's, exactly how it is shown in this video: Warning: Spoiler! [ Click to expand ][ Click to hide ]
All Rights Reserved To Chuteuk, RedPowder & EMP.
All Graphical & Text rights reserved to Richard. Special Thanks to the following Players for helping me create this guide: Walk3r, Tyler, Brother Progr4mm3r, James Stone, RedPowder , Krytastic, Spoderman, Holly Banker, Doombringer, Paramontana & Blocked. Long Live |
|
|
The topic has been locked.
The following user said Thank You: Raeker
|
[SSRP] Information Thread 9 years 8 months ago #404285
|
Welcome!

Aim of the Guide: The aim of this guide is to help new players and old on finding out new ways to make money fast and easy, This guide will be split in to 2 half's and will hopefully be used by people if it's good enough and provides enough backstory towards it, So let's begin! If you'd like for me to add anything or suggest stuff to be added/removed, feel free to message me on steam! 
Warning: Spoiler! [ Click to expand ][ Click to hide ] You can now make money by not going to jail or finding it hard to make some easy money, I've put together a few stuff that would help anyone out if they decide to use this thread, This is the Legal Way to make easy money while having fun on what you're doing! Mining: Mining is a fantastic way to earn money or you can use the rocks to craft items, You can do 2 things while being a miner. Sell Rocks: If you'd like to sell your rocks to the Miner NPC for $ then you can do so!, They're currently 3 rocks that you can mine, StoneGoldRuby, You need to rank up your skills so you can proceed to mine Gold & Ruby, Ruby is a lot harder to mine if you don't have a Diamond Pickaxe. Here are the prices of what the NPC buys your rocks for: Stone: Stone sells for $450 per rock, That's $45,000 per 100 rocks you sell to the Miner NPC. Stone is the most easiest rock to mine due to you can be any level to mine it, You could also use Stone to make items like VIP Pickax all the way to Steel, If you'd like to know more on what you can craft then feel free to look below. Gold: Gold sells for $650 per rock, That's $65,000 per 100 rocks you sell to the Miner NPC. Gold is the second hardest rock to mine due to you need to be level 2 to be able to mine the rock, Sometimes your pickax fails then you need to keep clicking until you get enough rocks that you'd like to sell to the NPC. Gold could be used to make VIP Pickaxe's all the way to steel, if you'd like to know more on about crafting items then feel free to look down below. Ruby: Ruby sells for $870 per rock you sell to the Miner NPC, That's $87,000 per 100 rocks you sell to the Miner NPC. Ruby is the hardest rock to mine, due to you need to be level 3 to be able to mine the rock and it's a lot harder for you to mine it due to your pickax not successfully mining the rock, You could sell the rocks to the NPC or convert them in to gems to spin the wheel if they're a current event going on like Halloween & Christmas. It takes 5 seconds to mine 1 rock and sometimes when you mine your pickax won't be successful unless you've got a Diamond Pickax. Crafting: You can now craft items to make a new item and then you can sell that item on wards for a chance to get even more money, If you'd like to craft items then you can do so, Just go in game on either Server 1,Server 2, Server 3 and locate the mines, When you're at the mines you can see this table: 
All you need is a Hammer witch you can buy off the Miner NPC and then hit it on the table then you can start to craft items. If you're wondering what the Miner NPC looks like this is him: 
Once you find the Miner NPC walk up to him and press E then this menu pops up: 
There you can buy Pickax's & Hammers and sell rocks. Once you've got all the selected items then you can equip your hammer by going to f4 and then clicking on Inventory and then walk up to the table and Press E then you can select on the item you want to craft like this: 
Once you select Craft 1 or the selected item amount you want to craft click Craft 1 or Craft 10 then once you press it then it'll show you a crafting thing, Like this: 
Once your item has been successfully crafted you will see a text message in chat saying You've finally crafted the selected item then it will be placed in your inventory. 
Melons: If you've decided you want to make $ buy growing Melons then you can, All you need to do is go to the General Store located at the Fountain on server 1, There you can buy Ammo and Seeds for your growing needs, If you walk up to him he looks like this: 
If you walk up to him and press E on him then you will see this menu: 
Then here you can buy Melons, Melon Seeds cost $75 to buy 1 and $750 to buy 10, Then you need to go back to the place where you are basing/going to grow then press f4 and spawn in a pot, A pot costs $100 to buy. Once you've spawned in your pot you need to use your Gravitity gun and put the Seed in the pot. Once that has been completed then you need to wait 8 minutes for the seed to be fully grown in to Melons. If you want to know what this looks like then it's this: 
Once you press E on the pot then the Melon will be placed in your inventory so now you can sell it back to the General Store NPC or eat them. If you'd like to know what message pops up is this: 
Once you've finished growing you can go back to the General Store NPC and sell your product back to the NPC for Money. 1 Melon will make you $550 per each melon you sell back to the NPC, Thats $5,500 for 10 melons you sell back to the NPC. Carrots: If you've decided you don't want to grow melons and want to grow Carrots then you can, Just go to the General Store NPC and buy the Carrot Seeds, 1 carrot seed costs $50 to 1. Once you've bought your seeds then go back to the place where you are basing or will be growing them then press f4 and click on Pot to buy it, Once you've bought the Pot you need to pull out your Gravity gun and then drop your seed inside the pot. It takes 8 minutes for a Carrot to be successfully grown, Once it's grown you can sell it back to the General Store NPC or you can eat it for 10HP. So if you decide to eat it then if your health is low then you can eat that to get +10 Health Points. However, If you've decided you want to sell it back to the General Store NPC then you can, The NPC will give you $550 for each carrot you sell back to the NPC, That's $5,500 for each 10 you sell back to the NPC. Items There is also a new way to gain easy money in nothing to do basicly, All you need to do is buy items for a low price and then sell them for a higher price so you gain profit, The most easiest way to do this is buy RPGS for $700,000 and then sell it back on for $900,000 then you've made $200,000 profit, However you only start at $100,000 so you need to do other methods of earning money before you do this, This way is more profit if you've got time on your hands to spend just trying to sell stuff. Daily Objectives There is now a new unieque way to earn easy $ and items just by completing easy stuff, If you join one of our SSRP Servers and press F4 and click on Daily Objectives then you can see 3 rewards if you complete your daily obectives, You get new objectives each day and the rewards are amazing, Atfter you've completed day one and all the way to Day 7 then you get the biggest reward, If you're wondering what this looks like then it's this: 
So as you can see, They're alot of different ways to gain easy money in Zarp Gaming SSRP, If you find any more legal ways then go ahead and reply down below or message me on steam. 
Now it's time to go on to the Illegal ways to earn money, These ways will get you arrested if the police find out so watch out and be more careful!, These ways will earn you more money and at a lot faster pace due to you being allowed to do more stuff, Here is all the ways you can make money Illegally. Warning: Spoiler! [ Click to expand ][ Click to hide ] Printers: If you've found a nice cozy place to start earning money then you can buy Printers that will print money for you, Depending on what printers you have the faster you will earn more money in your pocket per hour, As a User at Zarp Gaming you have acsess to 4 printers. These 4 printers you can have a new range way of upgrading them so you can earn money more faster, Here are the prices of upgrading all of these printers. Saphire: Saphire printer costs $7,500 to spawn in the game, The upgrades after that are: Cooling Standard: It costs $241 dollars to upgrade the Sapphire printer to Standard. Improvised: It costs $482 to upgrade the Sapphire printer to Improvised. Eco: It costs $964 to upgrade the Sapphire Printer to Eco Refined: It costs $1,928 to upgrade the Sapphire printer to Refined. Pro: It costs $2,892 to upgrade the Sapphire printer to Pro Steel: It costs $3,856 to upgrade the Sapphire Printer to Steel. Carboon: It costs $5,784 to upgrade the Sapphire Printer to Carboon. Iridum It costs $7,712 to upgrade the Sapphire printer to Iridum Diamond: It costs $9,640 to upgrade the Sapphire printer to Diamond Heroic: It costs $33,258 to upgrade the Sapphire printer to Heroic. Paper Standard: It costs $241 dollars to upgrade the Sapphire printer to Standard. Improvised: It costs $482 to upgrade the Sapphire printer to Improvised. Eco: It costs $964 to upgrade the Sapphire Printer to Eco Refined: It costs $1,928 to upgrade the Sapphire printer to Refined. Pro: It costs $2,892 to upgrade the Sapphire printer to Pro Steel: It costs $3,856 to upgrade the Sapphire Printer to Steel. Carboon: It costs $5,784 to upgrade the Sapphire Printer to Carboon. Iridum It costs $7,712 to upgrade the Sapphire printer to Iridum Diamond: It costs $9,640 to upgrade the Sapphire printer to Diamond Heroic: It costs $33,258 to upgrade the Sapphire printer to Heroic. Saphire printer is the best printer a User can Spawn in the game. Emerald Printer: To spawn in a Emerald Printer it costs $5,500 to spawn the printer in, The upgrades after that are: Cooling Standard: It costs $80 dollars to upgrade the Emerald printer to Standard. Improvised: It costs $160 to upgrade the Emerald printer to Improvised. Eco: It costs $320 to upgrade the Emerald Printer to Eco Refined: It costs $640 to upgrade the Emerald printer to Refined. Pro: It costs $960 to upgrade the Emerald printer to Pro Steel: It costs $1,280 to upgrade the Emerald Printer to Steel. Carboon: It costs $1,920 to upgrade the Emerald Printer to Carboon. Iridum It costs $2,560 to upgrade the Emerald printer to Iridum Diamond: It costs $320 to upgrade the Emerald printer to Diamond Heroic: It costs $11,040 to upgrade the Emerald printer to Heroic. Paper: Standard: It costs $80 dollars to upgrade the Emerald printer to Standard. Improvised: It costs $160 to upgrade the Emerald printer to Improvised. Eco: It costs $320 to upgrade the Emerald Printer to Eco Refined: It costs $640 to upgrade the Emerald printer to Refined. Pro: It costs $960 to upgrade the Emerald printer to Pro Steel: It costs $1,280 to upgrade the Emerald Printer to Steel. Carboon: It costs $1,920 to upgrade the Emerald Printer to Carboon. Iridum It costs $2,560 to upgrade the Emerald printer to Iridum Diamond: It costs $320 to upgrade the Emerald printer to Diamond Heroic: It costs $11,040 to upgrade the Emerald printer to Heroic. Emerald printer is the best second printer a user can spawn in. Amethyst printer is the third best printer to spawn in, It will cost you $2,500 to spawn it in, Here are the upgrades after it: Amethyst Cooling Standard: It costs $48 dollars to upgrade the Amethyst printer to Standard. Improvised: It costs $96 to upgrade the Amethyst printer to Improvised. Eco: It costs $192 to upgrade the Amethyst Printer to Eco Refined: It costs $384 to upgrade the Amethyst printer to Refined. Pro: It costs $576 to upgrade the Amethyst printer to Pro Steel: It costs $768 to upgrade the Amethyst Printer to Steel. Carboon: It costs $1,152 to upgrade the Amethyst Printer to Carboon. Iridum It costs $1,536 to upgrade the Amethyst printer to Iridum Diamond: It costs $1,920 to upgrade the Amethyst printer to Diamond Heroic: It costs $6,624 to upgrade the Amethyst printer to Heroic. Paper: Standard: It costs $48 dollars to upgrade the Amethyst printer to Standard. Improvised: It costs $96 to upgrade the Amethyst printer to Improvised. Eco: It costs $192 to upgrade the Amethyst Printer to Eco Refined: It costs $384 to upgrade the Amethyst printer to Refined. Pro: It costs $576 to upgrade the Amethyst printer to Pro Steel: It costs $768 to upgrade the Amethyst Printer to Steel. Carboon: It costs $1,152 to upgrade the Amethyst Printer to Carboon. Iridum It costs $1,536 to upgrade the Amethyst printer to Iridum Diamond: It costs $1,920 to upgrade the Amethyst printer to Diamond Heroic: It costs $6,624 to upgrade the Amethyst printer to Heroic. Topaz: Cooling: A Topaz printer is the worst printer you can buy, It will cost you $1,500 here are the upgrades after it: Standard: It costs $32 dollars to upgrade the Topaz printer to Standard. Improvised: It costs $64 to upgrade the Topaz printer to Improvised. Eco: It costs $128 to upgrade the Topaz Printer to Eco Refined: It costs $256 to upgrade the Topaz printer to Refined. Pro: It costs $384 to upgrade the Topaz printer to Pro Steel: It costs $512 to upgrade the Topaz Printer to Steel. Carboon: It costs $768 to upgrade the Topaz Printer to Carboon. Iridum It costs $1,024 to upgrade the Topaz printer to Iridum Diamond: It costs $1,280 to upgrade the Topaz printer to Diamond Heroic: It costs $4,416 to upgrade the Topaz printer to Heroic. Paper: A Topaz printer is the worst printer you can buy, It will cost you $1,500 here are the upgrades after it: Standard: It costs $32 dollars to upgrade the Topaz printer to Standard. Improvised: It costs $64 to upgrade the Topaz printer to Improvised. Eco: It costs $128 to upgrade the Topaz Printer to Eco Refined: It costs $256 to upgrade the Topaz printer to Refined. Pro: It costs $384 to upgrade the Topaz printer to Pro Steel: It costs $512 to upgrade the Topaz Printer to Steel. Carboon: It costs $768 to upgrade the Topaz Printer to Carboon. Iridum It costs $1,024 to upgrade the Topaz printer to Iridum Diamond: It costs $1,280 to upgrade the Topaz printer to Diamond Heroic: It costs $4,416 to upgrade the Topaz printer to Heroic. Topaz printer is the worst printer you could buy due to how long they take to print money, It's best for you to use Sapphire. Here is a photo that shows how much money you can make depending on the printer you have spawned in for yourself, This photo was made my Richard. 
Photo Made by Afrohat Drugs: You can make drugs but you need to be level 2 to begin growing, You can see your Skills if you press f4 and click on Skills. You can start growing weed and shrooms for more money, In my own opinion this is the best way to make money as it's fast and easy. Weed Seeds: Before you can start to grow you need to go to the Drug Dealer NPC and then buy your seeds before you can start growing them, Weed Seeds cost $250 to buy. You need to be level 2 in growing before you can start to grow weed. If you're looking for somewhere to buy your seeds you need to find the Drug Dealer NPC, If you're wondering what that is then it's this: 
Once you can see the NPC walk up to him and press E then this menu will pop up: 
There you can buy your Seeds if needed. Weed Plant: Now you've got everything you need and you're level 2 you can finally start to grow weed, Once you've found somewhere to base and start to making money then all you need to do is press f4 and then go to Shop, Once you're there you need to spawn in a pot, Once your pot has dropped on the grown you need to drop your weed seed and then pull out your gravity gun and drop it inside your Pot for it to begin growing, It takes 8 minutes for a weed plant to successfully grow and then once it's done you can press E on the plant and it'll be placed in your inventory. Now you can either eat your weed or sell it back on to the Drug Dealer NPC, The Drug Dealer NPC will buy your weeds from you at $2,500 a pop. You will earn $25,000 for every 10 Weed you successfully grow. Shrooms Spore: Now you've passed level 2 on the Growing skill and now you're level 3, You can now grow Shrooms, Shrroms is the biggest cash out prize out of Weed, Shrooms cost $200 to buy one, Once you've bought all you need then you can find a nice place to start growing, Once you've bought seeds you can spawn in a pot via the f4 menu, Once you've spawned in the pot then you need to pull out your Gravity gun and drop your Spore in the pot then it'll be successfully starting to grow! Shroom plants Now you've spawned in a pot and it's successfully growing, You need to wait 8 minutes for a plant to be successfully grown. After your plant has fully grown then you can press E on the pot and then it'll be placed in your inventory, Once your plant has successfully grown then you can either eat it or sell it back on to the Drug Dealer NPC for $, He will currently buy your Magic Mushrooms for $2,300 a pop, That's $23,000 for each 10 Shrooms you sell to the Drug Dealer NPC. Raiding: You can raid bases if you find one, All you need is a Criminal Job. You can press f4 and select a criminal job, The jobs that can raid are Thief,Hobo,Gangster,Mob Boss,Hobo. Once you've become one of they jobs then you need to lockpick the door, If you press 6 and then select your Lockpick and start lockpicking, Once you've done it a few times then you can change your skill level if you press f4 and buy the next skill. Once you've done lockpicking then the door or the fading door will open and you can finally walk in and start destroying there stuff.
Now, I'd just like to say a massive thanks for everyone reading this post. If you have any questions then feel free to add me on steam or just reply down below and I'll gladly help you out!
Post made by Jordan |
|

The topic has been locked.
The following user said Thank You: Raeker
|


[SSRP] Information Thread 9 years 8 months ago #404305

I have seen quite some posts and been asked in-game on how to auto convert rubies while AFK mining, well I hope this post will help you out because here is how you do it!
1) Alright so firstly, you will need an auto clicker which you may probably already have. Personally, I recommend NIAutoclicker since you can tab out of your game while AFK mining and auto converting. Just click here to download it! 2) Press ALT-DASH(-) to open the options and make sure that every 5 seconds, it will click or if you want use the spam instead (Not recommended as it can lag your chat box after awhile), then skip this step. 
3) Now in your Garry's Mod console, you will need to put the following in there: bind "mouse1" "_inven gems ruby 1;+attack"[code]bind "mouse1" "_inven gems ruby 2;+attack"3) Go to the mines on server 1, 2, or 3 and go up to ruby rock. Then you will need to activate your auto clicker which will then start to mine the ruby and auto convert.
You can tell if it's automatically converting if it does this:

Or if it is mining the ruby rock and converting the gems as you are not clicking your mouse yourself.
I hope this guide will come in good handy to those who are interested in doing this! If there is a mistake in the post or you need some help if it fails to work, feel free to contact Clarky here!
Guide made by Clarky
- |
|

Edited 9 years 2 months ago by Clarky.
The topic has been locked.
The following user said Thank You: Raeker
|


[SSRP] Information Thread 9 years 8 months ago #404323

Hello There!
Due to some new people have made a bad start in making gangs, I thought I'd write this guide out to help you to the best of my ability. If you'd like to suggest stuff or ask me questions then please write them down below and I'll get to you as soon as possible.
How to create a gang: If you join in game and press f4 then go to "Gangs" you can see a new thing has popped up, If you're not in a gang you can see a option called "Create Gang". This will cost you $50,000 to do so. Funding Making a gang is hard if you're poor or have less money, I recommend having a good ammount of funds to start it off and get the ball rolling, Now don't just put all your money in it right away, due to you might not get any members and then you've just lost money. I recommend puting in $5,000,000 at first so that's something, Bare in mind you don't want to put in all of your money as it will be really hard at first. Name Now, You're wanting to make a unique name that will be known. You don't want to make a gang after games/items as it's just weird as most people want to join a gang that's unique and special in there own way. Just spend quite a bit of time thinking names or googling names for stuff then once your happy with the name then you want to make that gang that name. Reputation If you're in good relations with the community and you're not a rule breaker then that's a bonus as then people would join you as they know you won't get them in to trouble, I wouldn't start a gang if I was known as a rule breaker as then only rule breakers or nobody would join you and then you've just lost and letted the gang fail. Tough Starting a gang is really tough at first as you've got 0 upgrades so less people will join you due to not having enough upgrades to meet there needs, I'd recommend getting friends in the gang at first so it's known to be there and just focus on raiding and getting funds for the gang, Even when times are tough don't let it beat you, just strike back harder and then your gang will become a decent gang if you don't let hard times get you down. 
Now, getting members with 0 upgrades will be hard due to being so many other competitive gangs out there that might have more upgrades than you do/better than you. All you need to do is if you've just started off only invite friends until you get 1 or 2 upgrades then more people will be eager to join you due to you having some upgrades that makes them happy. Fellow Members: If you've already got members in your gang, Make sure you're strict on who you accept and don't do what most people do is accept everyone who applies, As if you do this your gang will be known as accepting everyone who's bad/good/rulebreaker and if you've got alot of rule breakers in your gang then your full gang will be in the bad books as then your gang will be known as the mingey gang who nobody wants to join. Applications: If you've made an application, I'd recommend making it good and snazzy so you'll learn most things about people before they're even in your gang, Now I'm not talking about asking them to write out a full essay just to join your gang as most people are lazy, Make it short and enough detail that you require. Members with Upgrades: If you're lucky enough to get this far with your gang then you've overcame some of the obstacles, Just remember to not accept every person in your gang as then rule breakers will join and then that's your gang always known as rule breakers, I'd check them every week if you're hosting meeting and always speak to officers to see if they have any problems. As Friendliness is key to become a successful gang that player will join and love to be in. Reputation: I wouldn't recommend you back stabbing people, As then your gang will be known as people who back stab so people won't like you or your gang as they can't trust you. 
If you've just made a gang and you've got 0 upgrade, It'll take some time before you get one due to needing to have $50,000,000 and 50,000 loot for the cheapest upgrade. Just keep at it and get known with people who base a lot so you'll earn $$$ then just raid people so you manage to get Loot. Buying a gang: Yes, You could also buy a gang that has upgrades to make it easy for you, All you need is $$$$ and then the person who is selling there gang will make you owner of it so then you have upgrades if you don't want to earn them all yourself.
Suggestions:
If you've got any questions/suggestions to ask, Then post them down below and I'll help you out the best I can, Hopefully this guide helps you make a new gang and maks you understand it is quite hard to make it successful so be prepared! |
|
|
The topic has been locked.
The following user said Thank You: Raeker
|
[SSRP] Information Thread 9 years 8 months ago #404922

Introduction So, there's been a lot of controversy in regards to crosshairs, what's allowed and what isn't. Basically if you're unsure if your crosshair is allowed or not you shouldn't use it. However, this way I'll be showing you is allowed and you cannot be punished for it. Step One: Downloads In order to follow the further steps in this guide, you'll need to download the following Crosshair Overlay Software. Download Link: customdesktoplogo.wikidot.com/local--fil...esktop_Logo_V2.2.zip It should automatically download from there, open the ZIP file, the folder, and then finally load of the program CustomDesktopLogo. Step Two: Set Launch Options Next, you'll want to add the following commands to your launch options: -windowed -noborder
Library -> Right Click Garry's Mod -> Properties -> [General] Set Launch Options Step Three: Crosshair Settings Now the next step is where you're going to get your crosshair to physically appear on your screen. On your taskbar you should see something like this 
You'll need to right click this, and go to "Settings" Go here now: 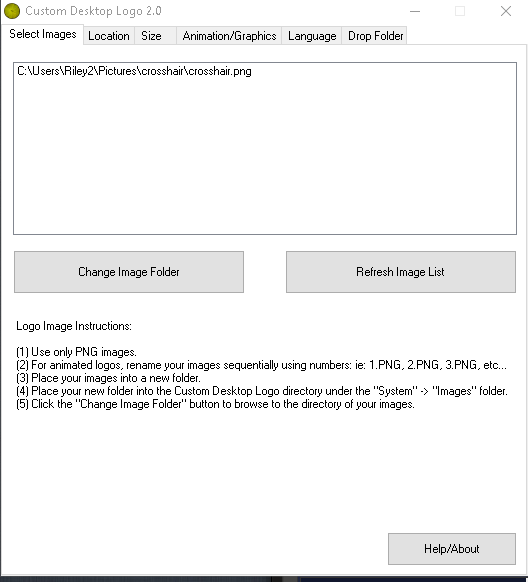
You'll need to make a folder somewhere in your Pictures under This PC. For instance, mine is called "crosshair". Step Four: Crosshair Image Now you'll need to go to google images and get a .png of a relatively small crosshair. Not too big, not too small. I'd recommend no more than a 200x200 pixel image. Once you've got your crosshair, place it in your crosshair folder and go back to your Settings on the program. Press Refresh Image List and the crosshair should now appear on your screen. Step Five: Crosshair Placement Now Under your Settings go to Location and under Display Location click Centre. 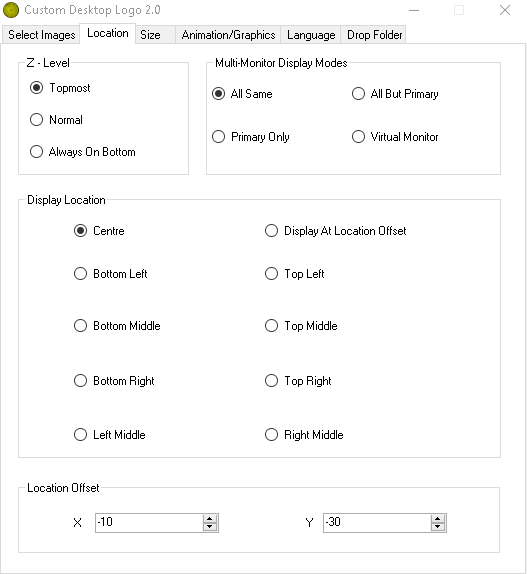
The Final Thing to do is simply right click the program on your task bar and make sure Drop Folder Mode is not enabled. Post made by Morgan |
|
|
The topic has been locked.
The following user said Thank You: Raeker
|
[SSRP] Information Thread 9 years 8 months ago #404923
|
Intro
So recently with the increasing demand for binds in order to equip things such as the Terroriser Outfit a lot of players have been trying to find a way to do so, this has been proven to be difficult due to the fact that binds don't allow you to nest quotes. This means that you can't do something such as the example below due to it making you put quotes within quotes. bind "_inven use "Terroriser Outfit""Tutorial For this example I'll show you how to make a bind for the Terroriser Outfit, this works just the same for any other item. First of all navigate to the following folder: GarrysMod\garrysmod\cfgIn that folder create a .cfg file and put whatever command you'll want to run in order to equip your item and save the file with any given name as long as it's still a .cfg file. In my case that command would be: _inven use "Terroriser Suit"I named my file terroriser.cfg, this means that I'll need to remember that name for the actual bind once I'm ingame. Once you're ingame and you've saved your .cfg open your console and bind any key you wish to the following. exec <filename>bind "F11" "exec terrorsier"This bind successfully fixes the issue of not being able to bind with nested quotes via console, feel free to reply with futher questions here if you don't understand something or if you require help. Made By , Tyler Durden |
|


EX- TS3 Staff
EX- SSRP Head Admin
Edited 9 years 8 months ago by Luan.
The topic has been locked.
The following user said Thank You: Raeker
|
[SSRP] Information Thread 9 years 7 months ago #429546
|
Welcome to the Trading Advice thread, Here you can learn on how to be successful dealing with trades.

Now, The aim of this thread is to help new people who are still new to Zarp Gaming and to lend them a helping hand to give them some advice on trading with people through the servers.


Thanks for looking at this small guide/advice to learn how to trade, If you've got any suggestions below then please feel free to suggest them and if I like them I'll add them!
|
|
|
The topic has been locked.
The following user said Thank You: Raeker
|
[SSRP] Information Thread 9 years 3 days ago #606411

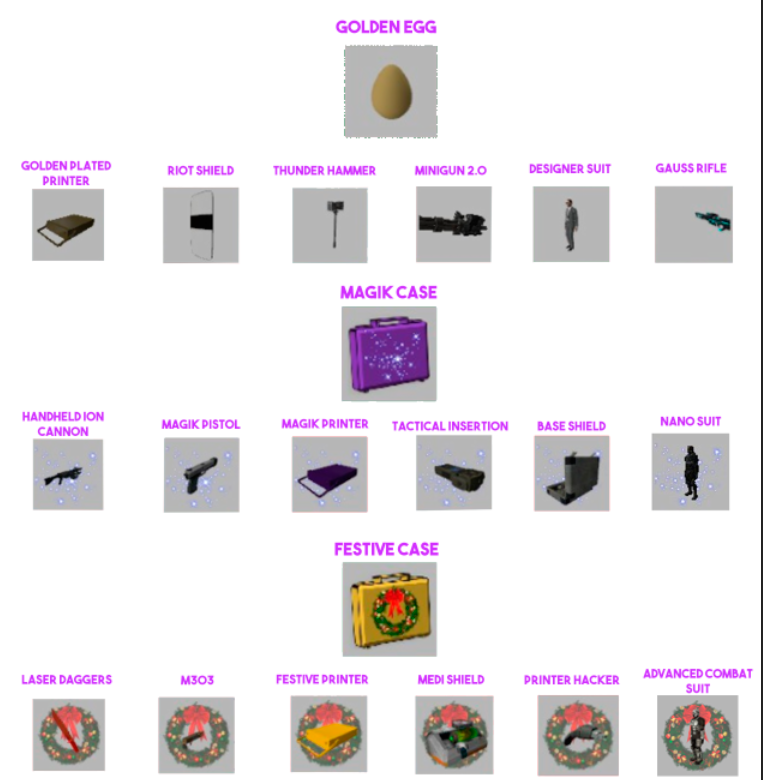
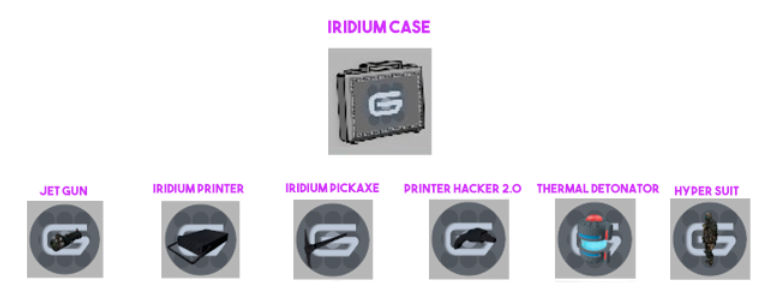
Credits to Xeronise |
|
|
The topic has been locked.
The following user said Thank You: Raeker
|
[SSRP] Information Thread 8 years 8 months ago #718146
|
How to AFK mine Steel!
Welcome to my guide on how to AFK mine Steel, it's not going to go too in depth, just short and simple.
To start off with you will need at least two accounts that own Garry's Mod and be in a gang that owns Craft Anywhere. You'll then need to open up Garry's Mod on both accounts, if you don't know how to do that Gmod Troller made a guide which can be found here: Clickity Click Guide to mining Stone On your account that will be mining the Stone and gifting it to your main account you will need to input the console command found in the message below. bind mouse1 "_inven gift stone 1 <INSERT YOUR USER ID HERE>; +attack"To locate your UserID simply type 'status' into your console and look for your main account and just to the left of it should be a number which can vary in an ammount of digits, what the number means is how many people have joined, since the last restart. For example if you were the first person to join after a restart your ID will be 1*. *USER ID'S CHANGE EVERY TIME YOU JOIN THE SERVER! Make sure your autoclicker's interval is set to eleven seconds due to the delay of gifting being 10 seconds. Your alternate accounts inventory space will never fill up if you do this right so make sure your account with the least ammount of inventory space is the one used to gift items to your other account. Guide to mining gold and automatically crafting On your account that will be mining the Gold and automatically crafting the Steel you will need to input the console command found in the message below. bind mouse1 "__crft Steel 5; +attack"That is all that is needed just AFK mine like normal. The number found after the Steel input is the ammount of Steel you will be crafting I have no experimented with what is better so far however this number can be changed to whatever you want. You main account will more than likely gain full inventory space but there is no exact number of time that it will take to fill up due to booster packs making different players have varying inventory size. I personally have 900 inventory space so I could go for hours before it fills up. Once again, you WILL need Craft Anywhere!
The End
Hopefully this guide helps a lot of players, if there is any errors found within it do speak up as I want to make sure this is as accurate as possible.If you have a better method to do this then please hit me up so I can make the guide better. Thanks for reading enjoy the rest of your day! Credits to Nafe |
|
|
The topic has been locked.
The following user said Thank You: Raeker
|
Time to create page: 0.385 seconds
204 PLAYERS ONLINE
0/127
Online
0/40
Online
1/47
Online
0/32
Online
0/32
Online
0/42
Online
0/42
Online
 Discord
203/1023
Online